Node.js Security + Authentication

Welcome to my blogging space! I'm Shivkaraman S, an aspiring Full Stack Developer passionate about web development. I specialize in JavaScript, React, Node, Express, MongoDB and MySql and I'm excited to share my insights and experiences through engaging content. Join me as we explore the world of web development together and create remarkable digital experiences.
1. Introduction
Node.js authentication refers to the process of verifying the identity of users accessing a Node.js application. This is a crucial aspect of web development to ensure that only authorized users can access specific resources or perform certain actions within an application. Authentication is commonly used for user login, sign-up, and protecting sensitive data.
2. Do not reinvent the wheel
It is considered a best practice to use existing authentication libraries rather than implementing authentication from scratch for several reasons:
Security: Established authentication libraries have undergone extensive testing and scrutiny by the community. This helps ensure that the authentication process is secure and robust, reducing the risk of vulnerabilities or security flaws.
Standards Compliance: Authentication libraries often follow industry standards and best practices. This adherence to standards enhances interoperability, allowing developers to integrate authentication seamlessly with other components and services.
Time Efficiency: Implementing authentication is a complex task that involves handling various security considerations. Using existing libraries saves development time and effort, enabling developers to focus on other aspects of the application.
Scalability: Authentication libraries are typically designed to scale with the growth of an application. They handle common challenges associated with authentication in large-scale systems, such as session management and token validation.
Community Support: Established libraries have an active community of developers who contribute to their maintenance and improvement. This community support ensures that the authentication system stays up-to-date with the latest security practices and technologies .
3. Stop using HTTP
All this time, our online interactions have largely relied on HTTP servers, which, unfortunately, operate without crucial security measures. In HTTP, data travels as plain text, vulnerable to evils eyes. Anyone with the right tools can potentially intercept and tamper with sensitive information. That's where HTTPS, or Hypertext Transfer Protocol Secure, steps in.
HTTPS is the secure sibling of HTTP, introducing a vital layer of protection to our data exchange process. Unlike HTTP, HTTPS encrypts the data during before sending it, making it unreadable. It not only shields against eavesdropping but also provides authentication, assuring users of a secure and genuine connection with the intended website.
To achieve this security, HTTPS relies on protocols like SSL (Secure Sockets Layer) and its successor TLS (Transport Layer Security). These cryptographic protocols establish a secure channel between your browser and the server, ensuring the confidentiality and integrity of the exchanged data. The transition from HTTP to HTTPS isn't merely a protocol switch; it's a fundamental move to fortify online communication, safeguard sensitive details, and foster user trust.
4. Digital Signatures and SSL/TLS certificate
We've learned that HTTPS uses the SSL and TLS protocols to encrypt our HTTP connections. Now, for our data to be encrypted, we need what's called an SSL or TLS certificate. This is a type of digital certificate used to verify the server's ownership before any encrypted data is sent. These certificates are signed by a certificate authority, an organization trusted by your computer or browser to issue valid digital certificates. In the past, these certificates were expensive, but now, services like 'Let's Encrypt' offer them for free. However, Let's Encrypt imposes certain conditions, such as having a domain name.
In the absence of a certificate authority, we can use self-signed certificates for development. While they allow encryption, they lack trusted third-party verification, making them unsuitable for production. Browsers issue warnings for self-signed certificates, highlighting the security risk. In production, we should always opt for certificates signed by certificate authorities, as they are trusted by most web clients, providing a secure and verified connection.
All TLS certificates serve two purpose: ensuring the encryption and verification of server ownership.
5. HTTPS with Node.js and Self Signed Certificates
Learn how https works by watching this YouTube video. We can create an https server the same way we created an http server.
const https = require('https');
const express = require('express');
const fs = require('fs');

const app = express();
https. createServer({
    key: fs.readFileSync('key.pem'),
    cert: fs.readFileSync('cert.pem'),
}, app). listen (PORT, () => {
    console. log('Listening on port ${PORT} ... ');
}
But here, we have something extra: We have an options object in which we describe the path to the key and the SSL certificate . This ensures a secure communication channel for the server. But how do we generate key and certificate?
We are going to use something called OpenSSL to generate key and certificates. We often use self-signed certificates to test out https servers in development mode. Here is how we can do it:
openssl req -x509 -newkey rsa:4096 -nodes -keyout key.pem -out cert.pem -days 36
req: This indicates that the command is for certificate requests.-x509: This option specifies that a self-signed certificate is being generated.-newkey rsa:4096: It instructs OpenSSL to generate a new RSA key of 4096 bits.-nodes: This flag specifies that the private key should not be encrypted with a passphrase, ensuring it's not protected by a password.-keyout key.pem: Specifies the file name where the generated private key will be saved (in this case,key.pem).-out cert.pem: Specifies the file name for the generated certificate (in this case,cert.pem).-days 365: Sets the validity period of the certificate to 365 days, meaning it will expire after one year.
6.Helmet.js
Helmet.js is a middleware for Express.js, a popular web application framework for Node.js. The primary purpose of Helmet.js is to enhance the security of web applications by setting various HTTP headers that help protect against common web vulnerabilities.
Key Features and Usage:
HTTP Headers: Helmet.js sets HTTP headers in the responses sent by your Express application. These headers can help mitigate common security risks. For example:
Content Security Policy (CSP): Helps prevent cross-site scripting (XSS) attacks by defining which content sources are allowed.
Strict-Transport-Security (HSTS): Enforces secure (HTTPS) connections to the server, reducing the risk of man-in-the-middle attacks.
X-Content-Type-Options: Prevents browsers from interpreting files as a different MIME type, reducing the risk of attacks based on content type confusion.
X-Frame-Options: Prevents your site from being embedded within frames, protecting against clickjacking attacks.

Middleware Configuration: Integrating Helmet.js into an Express application is straightforward. You can use it by adding the middleware in your application code. For example:
 const express = require('express');
 const helmet = require('helmet');
 const app = express();

 // Use Helmet middleware
 app.use(helmet());
By calling
app.use(helmet()), you enable helmet's default security headers.Customization: While the default settings are beneficial, Helmet.js allows customization based on specific security requirements. You can enable or disable individual middleware functions for different headers, depending on your application's needs.
Improving Server Security:
Helmet.js contributes to server security in several ways:
Mitigating Common Vulnerabilities: By setting secure HTTP headers, Helmet.js helps prevent or minimize the impact of common web vulnerabilities, such as XSS, clickjacking, and MIME-type confusion.
Security Best Practices: Helmet.js encourages the implementation of security best practices by making it easy to adopt and configure security-related HTTP headers. This reduces the likelihood of oversights or misconfigurations that could lead to security vulnerabilities.
Default Protection: The default settings of Helmet.js provide a solid baseline of security measures. This means that, even without extensive customization, you get a level of protection against common threats.
In summary, Helmet.js is a valuable middleware for Express.js applications, helping improve server security by setting secure HTTP headers that mitigate common web vulnerabilities. It simplifies the implementation of security best practices and provides a configurable solution to meet specific security requirements.
7. Authentication vs Authorization
Authentication is the process of verifying the identity of a user, system, or entity using redentials such as a username and password while authorization is the process of determining what actions or resources the authenticated user, system, or entity is allowed to access or perform.
In short:
Authentication verifies identity.
Authorization determines permissions and access rights.
8.Json Web Tokens (JWT)
JSON Web Token (JWT) is a compact and self-contained way for securely transmitting information between parties as a JSON object. This information can be verified and trusted because it is digitally signed. JWTs can be signed using a secret (with the HMAC algorithm) or a public/private key pair using RSA or ECDSA.
In its compact form, JSON Web Tokens consist of three parts separated by dots (.), which are:
Header
Payload
Signature
Therefore, a JWT typically looks like this: xxxxx.yyyyy.zzzzz

Header
The header typically consists of two parts: the type of the token, which is JWT, and the signing algorithm being used, such as HMAC SHA256 or RSA.
For example:
 {
   "alg": "HS256",
   "typ": "JWT"
 }
Then, this JSON is Base64Url encoded to form the first part of the JWT.
Payload
The second part of the token is the payload, which contains the claims. Claims are statements about an entity (typically, the user) and additional data. There are three types of claims: registered, public, and private claims.
Registered claims: These are a set of predefined claims which are not mandatory but recommended, to provide a set of useful, interoperable claims. Some of them are: iss (issuer), exp (expiration time), sub (subject), aud (audience), and others.
Public claims: These can be defined at will by those using JWTs. But to avoid collisions they should be defined in the IANA JSON Web Token Registry or be defined as a URI that contains a collision-resistant namespace.
Private claims: These are the custom claims created to share information between parties that agree on using them and are neither registered or public claims.
An example payload could be:
  {
    "sub": "1234567890",
    "name": "John Doe",
    "admin": true
  }
In this example:
"sub": Subject claim indicates the subject of the JWT (user ID).
"name": Custom claim includes the user's name.
"iat": Issued At claim indicates the time at which the JWT was issued.
The payload is then Base64Url encoded to form the second part of the JSON Web Token.
Do note that for signed tokens this information, though protected against tampering, is readable by anyone. Do not put secret information (like passwords) in the payload or header elements of a JWT unless it is encrypted.
Signature
To create the signature part you have to take the encoded header, the encoded payload, a secret, the algorithm specified in the header, and sign that.
For example if you want to use the HMAC SHA256 algorithm, the signature will be created in the following way:
 HMACSHA256(
   base64UrlEncode(header) + "." +
   base64UrlEncode(payload),
   secret)
If you want to play with JWT and put these concepts into practice, you can use jwt.io Debugger to decode, verify, and generate JWTs.
9.Working and Implimentation of JWT
User Authentication:
User Login:
User provides credentials: When a user logs in, they typically provide their credentials, such as a username and password.
Server verifies credentials: The server validates the provided credentials against its user database to ensure correctness.
JWT generation: If the credentials are valid, the server creates a JWT to represent the user's authentication state.
JWT Generation:
Header and Payload creation: The server creates a JWT by generating a header and a payload. The header includes information about the token, such as the type and the signing algorithm. The payload contains claims about the user (e.g., user ID, username, roles).
Example Header:
   jsonCopy code{
     "alg": "HS256",
     "typ": "JWT"
   }
Example Payload:
   jsonCopy code{
     "sub": "1234567890",
     "username": "john_doe",
     "roles": ["user"]
   }
Signing: The server then signs the header and payload using a secret key and a specified algorithm to create the JWT's signature. The resulting signature is appended to the JWT.
Example Signature:
HMACSHA256(base64UrlEncode(header) + "." + base64UrlEncode(payload), secret)JWT Formation: The final JWT is created by concatenating the encoded header, encoded payload, and signature.
Example JWT:
eyJhbGciOiJIUzI1NiIsInR5cCI6IkpXVCJ9.eyJzdWIiOiIxMjM0NTY3ODkwIiwidXNlcm5hbWUiOiJqb2huX2RvZSIsInJvbGVzIjpbInVzZXIiXX0.sXs2LZMwwWtAdpVZZBKq0fJNse6G9AmKpUE1INRisLwHere is an example of how JWT tokens are generated using the
jsonwebtokenlibraryconst jwt = require('jsonwebtoken'); const jwtSecret = 'sdkfk221l3k4sd2f4sdfdsfndsbf'; app.post('/signin', async function createUser(req, res, next) { const { username, password } = req.body; // Check if both username and password are present (input validation) if (!username || !password) { return res.status(400).json({ message: "Username and password are required in headers", }); } // User is a MongoDB model try { const user = await Users.create({ username, password, }); //Creating a token using jwt.sign() const token = jwt.sign( { id: user._id, username, role: user.role }, jwtSecret, ); //Generated token is then sent in the response to the client. return res.status(201).json({ message: "User successfully created", token, }); } catch (error) { return res.status(400).json({ message: "User not successfully created", error: error.message, }); } });
User Authentication Response:
JWT sent to the client: The server sends the JWT back to the client as part of the authentication response.
Client stores the JWT: The client typically stores the received JWT securely. Common storage locations include browser cookies, local storage, or session storage.
Subsequent Requests:
Authorization Header: For subsequent requests to protected resources, the client includes the JWT in the Authorization header of the HTTP request.
Example Authorization Header:
Authorization: eyJhbGciOiJIUzI1NiIsInR5cCI6IkpXVCJ9.eyJzdWIiOiIxMjM0NTY3ODkwIiwidXNlcm5hbWUiOiJqb2huX2RvZSIsInJvbGVzIjpbInVzZXIiXX0.sXs2LZMwwWtAdpVZZBKq0fJNse6G9AmKpUE1INRisLwServer Verification
JWT Decoding: The server receives the JWT from the client and decodes it by splitting the JWT into its header, payload, and signature parts.
Signature Verification: The server computes the signature using the same algorithm and secret key. If the computed signature matches the one in the JWT, the server considers the token valid.
Claims Extraction: The server extracts claims from the decoded payload to determine the user's identity and roles.
Access Granted: If the JWT is valid and the user has the required permissions (based on claims), the server grants access to the requested resource.
    app.get('/users', function (req, res) {
        const token = req.headers.authorization;
        try {
            const decoded = jwt.verify(token, jwtSecret); //Decoding
            const username = decoded.username;

            //Return a list of users other than this username
            return res.status(400).json({
                users: await Users.find({ username: { $ne: username } });
            });
        } catch (err) {
            return res.status(403).json({
                msg: 'Invalid token',
            });
        }
    });
Example of how JWT is used when user logs in to a website like amazon & facebook:
When a user logs in by entering their username and password, the server checks if the credentials are valid. If they are, the server creates a JWT token and sends it back to the user. This token serves as a proof of authentication. The user stores this token securely, often in local storage or cookies. From that point on, for every future request to the server, the user includes the JWT token in the request header. This way, the server can identify the user without the need to send the username and password with every request.
Without JWT tokens, the user would indeed have to send their username and password for every single request, which can be less secure and more resource-intensive. JWTs simplify and secure the process, eliminating the need for constant reauthentication.
Refer to this article for step-by-step and in-depth explanation of authentication using with and without JWT.
10. OAuth 2.0
OAuth (Open Authorization) is an open standard and protocol for secure authorization and delegation of access. It provides a framework for third-party applications to obtain limited access to an HTTP service (such as a web application) on behalf of a user, without exposing the user's credentials. OAuth is widely used for enabling secure authentication and authorization between different systems, particularly in scenarios involving APIs and web applications.
Example of OAuth: Users can log in to various websites or apps using their Google or Facebook accounts(Login with google or facebook option) without sharing their login credentials with the third-party site.
The OAuth framework typically involves the following components:
Resource Owner: The entity that can grant access to a protected resource (googe or faceook account). In most cases, this is the end-user.
Client: The application that requests access to a protected resource on behalf of the resource owner. This could be a mobile app, a web application, or any other type of software on which you are trying to login.
Authorization Server: The server that authenticates the resource owner and issues access tokens after getting proper authorization. It's responsible for validating the identity of the client. (Google or Facebook authentication server)
Resource Server: The server hosting the protected resources. It accepts and responds to requests using access tokens. (Actual server of the app or website)
Access Token: A token that represents the authorization granted to the client. It is used by the client to access protected resources on behalf of the resource owner.
OAuth work flow:

When the user clicks on the "Sign in with Google" button to log in the following steps take place:
Authorization Code Request is sent to
/authorizeroute on the Authorization server (Google).Authorization Server redirects you to the login page of OAuth(Google account login page)
The user is prompted to log in to their Google account (if not already logged in) and then to grant the requested permissions to the website(Authentication & Consent).

Once the user grants permission, the authorization server (Google) generates an authorization grant (it can take various forms, such as an authorization code or user credentials) and redirects the user back to the website with this grant.
The client now has the authorization grant, sends a request to Google's
tokenendpoint to exchange the grant for an access token.Google's authorization server validates the grant and issues an access token (JWT) to the website. The website uses the obtained access token to make API requests to Google on behalf of the user, such as retrieving their profile information or email address.
Now the client can use the access token to make requests to the website.
11. Implementation of Google's OAuth 2.0
Register Your Client App on the Authorization Server to Obtain OAuth Credentials:
Begin by either creating a new project or selecting an existing one on Google's OAuth website. Proceed to register your application for OAuth 2.0 by following the outlined steps in the provided documentation or watch this YouTube video to establish a connection with Google's OAuth server. This involves creating OAuth client credentials, such as client ID and client secret, configuring consent screens, and enabling necessary APIs for your application. Ensure to handle credentials securely and adhere to best practices outlined by Google for OAuth 2.0 implementations.
Google authentication server identifies our application using the Client ID and Client Secret and keeps the Access Token secure.
 CLIENT_APP_ID=542685936115-t6b82l8f0s3S988pc3me5adh.apps.googleusercontent.com
 CLIENT_APP_SECRET=NF4sJq980cO_qWT_KokKMumfR
 REDIRECT_URI=/auth/google/callback
Configure the Endpoint Used To Redirect User to Authorization Server:
Now to configure the endpoint used to redirect the user to the authorization server to authenticate and seek the user’s consent.
Firstly, go to the
utils.jsfile and insert the following code.const query_string = require ('querystring'); const google_auth_token_endpoint ='https://accounts.google.com/o/oauth2/v2/auth'; const query_params = { client_id: process.env.CLIENT_APP_ID, redirect_uri: `http://localhost:4000${process.env.REDIRECT_URI}`, }; // This objects contains information that will be passed as query params to the auth token endpoint const auth_token_params = { ...query_params, response_type: 'code', }; // The scopes (portion of user's data) we want to access const scopes = ['profile', 'email']; // a url formed with the auth token endpoint and the const request_get_auth_code_url = `${google_auth_token_endpoint}?${query_string.stringify(auth_token_params)}&scope=${scopes.join (' ')}`; module.exports ={request_get_auth_code_url}The above code uses the query string module, then defines the Google API endpoint to obtain an access token and, lastly, creates a composed object with the following keys and their meanings.
Redirect URI: the endpoint used by the authorization server to issue the authorization token
Response type: must be set to code to ensure that the server issues an authorization code (type of authorization token).
Client ID: ID generated on Google Cloud Console.
A variable called scopes is then defined, which holds an array of strings that specifies the segment of the user’s information we want to access. Finally, a URL composed of the Google API endpoint and a query string formed from the composed object and the scopes defined above is bound to a variable and finally exported.
Now we need to modify the server.js file.
    onst express= require('express');
    const utils = require ('./utils');

    //Triggered when user clicks 'Continue with google'
    app.get ('/auth/google', async (req, res) => { //Step 1
      try {
        res.redirect (utils.request_get_auth_code_url); //Step 2
      } catch (error) {
        res.sendStatus (500);
        console.log (error.message);
      }
    });
The first 2 steps of the OAuth flow take place here:
When a user clicks 'Continue with Google', a get request is sent to
/auth/googleroute on our server.We redirect the user to the authorization server (Google account Authentication and consent) using the URL we imported earlier
Configure the Endpoint To Obtain the Authorization Token
After the user successfully authenticates, the authorization server makes a GET request to the redirect URI provided in the previous request (
/auth/google/callback) and sends the Authorization code (Authorization token)app.get("/auth/google",(req,res)=>{.....}) app.get (process.env.REDIRECT_URI, async (req, res) => { // Get authorization token from request parameter const authorization_token = req.query.code; //Step 4 });Step 3 and 4 of the OAuth flow is accomplished:
Authorization and consent
Authorization token grant.
Use This Authorization Token to Obtain an Access Token:
Now we have obtained the authorization token. It’s time to exchange this token for an access token. Include the following in your
utils.jsfile.const query_string=require(...) const axios = require("axios") const google_access_token_endpoint = 'https://oauth2.googleapis.com/token'; const query_params={....} const get_access_token = async auth_code => { const access_token_params = { ...query_params, client_secret: process.env.CLIENT_APP_SECRET, code: auth_code, grant_type: 'authorization_code', }; return await axios ({ method: 'post', url: `${google_access_token_endpoint}?${query_string.stringify (access_token_params)}`, }); }; module.exports = {request_get_auth_code_url, get_access_token};In the above code, we first imported the Axios module. Next, we defined the endpoint used to obtain the access token. After that, we defined a method that expects the authorization token as its parameter, and then finally, we created an object with several keys such as the client id, client secret as well as other newer parameters, which include:
Client secret: a string used to sign our request.
Grant type: as said earlier, this is a set of authorization codes. This field could hold a password or any other grant type depending on the application needs.
Code: this holds the authorization code.
Internally, this method makes a post request to the endpoint to obtain the access token.
In the server.js file, include the following code.
    app.get (process.env.REDIRECT_URI, async (req, res) => {
      // get authorization token
        const authorization_token = req.query.code;
        try {
            //Step 5: Get access token using authorization token
            const response = await utils.get_access_token (authorization_token.code);
            console.log ({data: response.data});

            //Step 6: Get access token from payload
            const {access_token} = response.data;
        } catch (error) {
            res.sendStatus (500);
        }
    });
The above code uses the method defined in the utils.js file to request the access token. The response to this request contains several values such as the following:
Access token: used to obtain the resource
Refresh token (optional): used to obtain another access token if the current one expires
Use the Access Token to Obtain the User Profile Data:
Finally, we use the access token to obtain the user’s resources similarly as we did before updating our utils.js file with the following.
 const get_profile_data = async access_token => {
   return await axios ({
     method: 'post',
     url: `https://www.googleapis.com/oauth2/v3/userinfo?alt=json&access_token=${access_token}`,
   });
 };
 module.exports = {
     request_get_auth_code_url,
     get_access_token,
     get_profile_data
 };
The above code defines another method that receives the access token as its parameter and then makes an HTTP post request to access the user’s profile data in the request URL.
We defined and exported a method that we would use to get the user’s profile information. Next, we now import and use this method in our
server.jsfile as follows.app.get (process.env.REDIRECT_URI, async (req, res) => { const authorization_token = req.query; console.log ({auth_server_response: authorization_token}); try { // get access token using authorization token const response = await utils.get_access_token (authorization_token.code); // get access token from payload const {access_token} = response.data; // get user profile data const user = await utils.get_profile_data (access_token); const user_data = user.data; res.send (` <h1> welcome ${user_data.name}</h1> <img src="${user_data.picture}" alt="user_image" /> `); } catch (error) { console.log (error.message); res.sendStatus (500); } });We now obtain the user’s profile data.
12. Implementation of Google's OAuth using passport.js library
Passport.js is a powerful module that simplifies Google authentication in Node.js applications. With concise and straightforward code, it streamlines the process of authenticating users using Google, unlike the long and complex code we wrote above. Its simplicity allows for easy integration, making it a go-to choice for developers seeking a hassle-free authentication solution in their Node.js projects.
const express = require('express');
const passport = require('passport');
const helmet = require('helmet');

const app = express();
app.use(helmet);
app.use(passport.Initialize()); //Sets up a session

const AUTH_TOKEN_PARAMS = {
    client_id = preocess.env.CLIENT_ID;
    client_secret = process.env.CLIENT_SECRET;
    redirect = `https//:localhost:3000/${process.env.REDIRECT_URI}`;
};

const verificationCallback = (accessToken, refreshToken, profile, done) => {
    console.log('Access Token recieved. Googe profile: ', prfile);
    return done(null, profile);
};

passport.use(new GoogleStrategy(AUTH_TOKEN_PARAMS, verificationCallback);

// Redirect the user to Google for authentication
app.get('/auth/google', (req, res) => {
    passport.authenticate('google', {scope: ['profile', 'email'] });
};

// The callback after Google has authenticated the user
app.get('/auth/google/callback', (req, res) => {
    passport.authenticate('google', {
        failureRedirect: '/login',
        successRedirect: '/'
    }, (req, res) => {
        console.log('Recieved Authorization Token');
    }
};

// Start the server
const PORT = process.env.PORT || 3000;
app.listen(PORT, () => {
  console.log(`Server is running on http://localhost:${PORT}`);
});
The above code is simple, short, and easy to understand and does the same work as in step 10. Here is what happens when a user clicks 'Continue with Google:
Preprocessing:
Helmet middleware is added to enhance security by setting various HTTP headers.
Passport is initialized using
passport.Initialize().Authentication parameters for Google, such as
client_id,client_secret, andredirect_uri, are set in theAUTH_TOKEN_PARAMSobject. These parameters are crucial for communication with Google's authentication service.A verification callback function (
verificationCallback) is defined. This function is invoked after successful authentication with Google and receives the access token, refresh token, user profile, and a callback function (done).
OAuth Flow:
Step 1 & 2: The
/auth/googleroute initiates the OAuth 2.0 authentication process. When a user clicks "Continue with Google," they are redirected to Google's authentication page with the specified scopes (profileandemail). Thepassport.authenticate('google', { scope: ['profile', 'email'] })middleware is responsible for initiating this redirection.Step 3: The users enter their Google login credentials and, if necessary, grant permission to the requested scopes.
Steps 4, 5, and 6:
The
/auth/google/callbackroute handles the callback from Google after successful authentication. It invokespassport.authenticate('google')to process the authentication details received from Google.The authentication process involves exchanging the authorization code received from Google for an access token. This is handled by the Passport Google strategy internally.
The verification callback (specified when configuring the Google strategy) is then invoked. This callback receives the accessToken and profile information.
The role of receiving the authorization code and exchanging it for an access token is typically managed by Passport and the Google strategy abstracted away from the developer in most cases.
13. Cookie Based Authentication
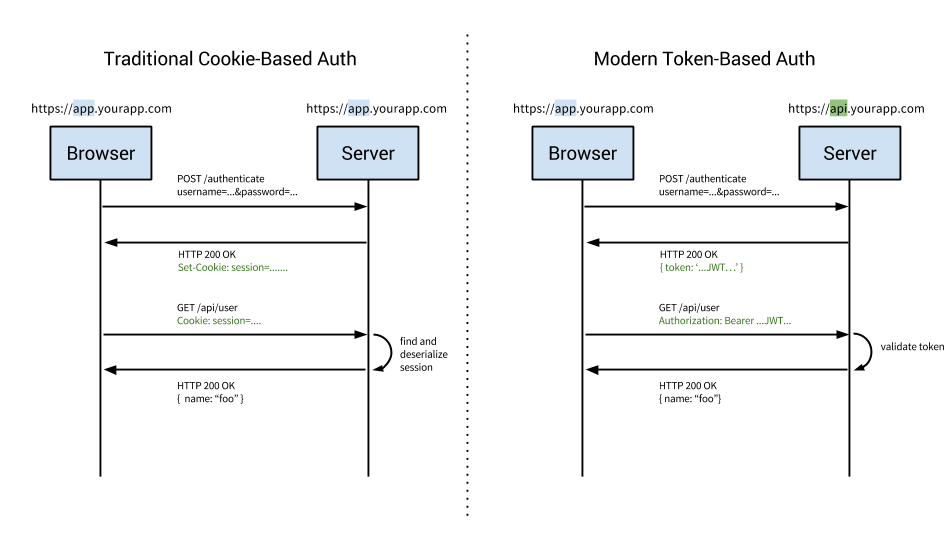
Until now, we have figured out different ways of authenticating the user, be it the JWT toker or the access token in OAuth, we need to send the access token to the resource server every time we make a request. We have two options
Setting the Authorization Attribute:
This method involves including the access token or JWT in the
Authorizationheader of the HTTP request. This is a common practice for securing API requests.This approach is straightforward and commonly used in scenarios where requests are made programmatically, such as with APIs or XMLHttpRequests.
Using Cookies:
Alternatively, you can use cookies to store and automatically send the access token with each request. The browser handles this process seamlessly, simplifying the implementation for web applications.
Cookies are automatically included in every HTTP request to the domain they belong to, reducing the need for manual header management.
Before we dive deeper into cookie-based authentication, we should know about sessions.
14. Sessions
A session, in the context of web development, refers to a mechanism for storing and managing data about the current active user during their interaction with a web application. It is a way to maintain state information between multiple requests from the same user.
Purpose of Sessions:
Temporary Storage: Sessions are used to store data that is relevant to a user's current interaction with the application. This can include information such as the user's name, the last visited page, or items in a shopping cart.
Sensitive Data Protection: Sessions are particularly useful for storing sensitive data that should not be directly modified by the user in their browser. Examples of such sensitive data include a user's bank balance or permissions to access server-side data.
Sessions vs. Databases:
Sessions are described as short-lived and are closely tied to a user's specific browser. They capture the state of an application during the user's interaction and are typically cleared when the user logs out or quits the application.
Databases, on the other hand, are more permanent storage solutions. They persist through many sessions and are not tied to a specific browser or user interaction. Databases often store data that needs to be retained over the long term, such as order history.
Example: When a user logs into a website, a session is created, and a unique identifier is stored on the user's device (often as a cookie). This identifier is used to link subsequent requests from the same user, enabling the server to maintain user-specific data, such as login status or preferences.
14.1. Server-Side Sessions and Client-Side Sessions
Sessions are most often used to store data about the current user who is logged in to our web application in their browser. We store sessions in one of two ways
We can have server-side sessions where user data lives on the server on the database, and the data would get looked up for each request that the user makes and potentially deleted if the user logs out or quits their browser.
A client-side session where we store session data in the browser, specifically in the browser's cookies.
Depending on if we're doing server-side sessions or client-side sessions, we'll be using cookies in one of two ways. Will either be using stateful cookies or stateless cookies.
Stateful cookies:
When using cookies for authentication, once the user is authenticated with the server by putting in the login credentials, the server responds by setting a cookie that stores this session identifier. This is what's known as a stateful cookie.
We use stateful cookies when we're doing server-side sessions.
We require a database to store our session data and our server needs to look up the session in that database for the user identified by the Session ID. However, this is difficult to scale as the number of users increases.
Stateless cookies:
Stateless cookies store minimal information on the client side and do not rely on server-side storage or management of session data
Stateless cookies contain all the necessary information within the cookie itself, eliminating the need for server-side storage of session data. Common information includes user identifiers, timestamps, and possibly cryptographic signatures for verification.
We use stateful cookies when we're doing client-side sessions.
Client-side sessions and server-side sessions have their own benefits. If we're highly concerned with keeping the data in our session a secret, we can keep this session on the server side, in a database that's not directly accessible to users.
However, in the vast majority of cases, client-side sessions are enough. However, it must be ensured that the session data isn't being modified or tampered with. There are several ways in which we can ensure that the session data is tamper-proof
Use Secure Cookies: When using cookies to store session information, set the
Secureattribute to ensure that cookies are only transmitted over secure (HTTPS) connections. This helps protect the session data during transit.HttpOnly Attribute: Set the
HttpOnlyattribute for cookies to prevent client-side scripts from accessing them. This helps protect against certain types of cross-site scripting (XSS) attacks.// Example of setting the HttpOnly attribute for a cookie Set-Cookie: sessionId=abc123; Secure; HttpOnly; SameSite=Strict;Cryptographic Signatures: Sign the session data using cryptographic techniques (e.g., HMAC) to create a secure signature. This signature is then included in the session data. Upon receiving the session data, the server can verify the signature to ensure its integrity.
14.2. Session Middlewares in Express
There are two main session middlewares in express:
Express Session (
express-session):This middleware is designed for server-side sessions.
It stores session data on the server, using cookies to only save the Session ID in the client's browser.
The actual session data, which may include user IDs and permissions, resides in a server-side database.
Various databases, such as Apache's Cassandra or MongoDB, can be used to store session data securely.
The default configuration uses in-memory storage, but it's not suitable for production due to limitations.
Provides a way to keep session data secret from the client.
Cookie Session (
cookie-session):This middleware is designed for client-side sessions.
Stores the entire session data directly in the user's cookie, eliminating the need for a server-side database.
Simplifies scaling, allowing multiple instances of the node server to handle different requests without shared state.
Useful for keeping the server stateless and enabling scalability with load balancing.
Cookies need to be small due to browser limitations (typically around 4096 bytes) and to minimize network traffic.
Session data is visible to the client, so it's not suitable for cases where data confidentiality is crucial.
Helps in keeping the node process stateless.
The choice between express-session and cookie-session depends on the specific requirements of the application, especially regarding security and scalability. Server-side sessions are more secure but may introduce complexities in scaling, while client-side sessions are simpler but have limitations on data size and visibility.
15. Setting up cookie-session
In the code that we have already written, we have already initialized a session using the passport.initialize() function, but we haven't populated the session yet. Add this to server.js .
const cookieSession = require('cookie-session');

//Save the session to the cookie
passport.serializeUser((user, done) => {
    done(null, user);
});

//Read the session from the cookie
passport.deserializeUser((obj, done) => {
    done(null, obj);
});
app.use(helmet);
app.use(cookieSession({
    name: 'session',
    keys: ['secret-key']

    // Cookie Options
    maxAge: 3 * 24 * 60 * 60 * 1000; //Session expiry date (3 days in this case)
}));
app.use(passport.Initialize());
app.use(passport.session()); // Authenticates the session using the secret key
cookieSession(options)
The cookie-session accepts these properties in the options object.
name: The name of the cookie to set, defaults to
session.keys: The list of keys that can be used to sign & verify cookie values. Set cookies are always signed with
keys[0], while the other keys are valid for verification, allowing for key rotation.secret: A string that will be used as a single key if
keysis not provided.cookie options: Other options are passed to
cookies.get()andcookies.set()allowing you to control security, domain, path, and signing among other settings.
The
keysfield in the options object is an array to accommodate potential key changes in the future, either due to a key leak or an upgrade to a more secure value. Changing the existing key will invalidate all the existing sessions, this means that someone who was logged in with the original secret key won't be able to use that session to log in. Instead, adding the new key to the beginning of the keys array ensures that both keys are valid. Later, when confident that all sessions are signed only by the new key (key[0]), the original key can be safely removed.
Reading and writing the OAuth session:
In Passport.js, passport.initialize(), passport.serializeUser(), and passport.deserializeUser() are essential functions used for user authentication and session management.
passport.initialize():This middleware initializes Passport. It must be employed before using passport in an Express application.
Its primary purpose is to set up passport, preparing it to handle authentication requests.
passport.serializeUser():After a user is authenticated, this function is invoked. It takes a user object and is responsible for determining what data to store in the session. Typically, it serializes the user information into a format that can be stored in the session (like a user ID).
The serialized data (user ID : User data) is then added to the session.
passport.session():The
passport.session()is a middleware that is responsible for deserializing the user.For every subsequent request made the user after authentication, this middleware verifies the session using the
cookie-sessionsecret key and calls thepassport.deserializeUserfor deserialization. The user's unique identifier (eg: user ID) is passed todeserializeUser.
passport.deserializeUser():deserializeUsershould retrieve the complete user object based on this identifier and call thedonecallback with the user object.The user object retrieved in
deserializeUseris attached toreq.user, making it accessible in route handlers.
The session middleware (
cookie-session) sets theSet-Cookieheader in the response, which includes the session ID and other necessary information.
Now we are all set, the user's login will be remembered for as long as the session is valid (3 days in our case). Our browser now contains two session data.
Signature of the session
Actual session data

We have a small problem in the above code, we are directly storing everything the browser sends directly into the session data without filtering the unwanted contents. This unnecessarily increases the session size which is not right. We can slightly modify the serializeUser function to store only the required data:
passport.serializeUser((user, done) => {
    done(null, {
        user.id,
        user.displayName,
        user.emails[0].value
    });
});
16. Restricting Access To Endpoints
Now here comes the most crucial part of authentication. Everything we have learned until now is just authentication, but the main application of this authentication protecting sensitive information that only authenticated users should access.
To achieve this, we verify the user's login status with each incoming request to the server seeking access to restricted data.
function checkLoggedIn(req, res, next) {
    //req.user is available only when user is logged in
    const isLoggedIn = req.isAuthenticated() && req.user;
    if(!isLoggedIn){
         return req.status(401).json({
            error: 'User must login'
        }
    }
    next();
}

//Say the following route must be restricted to only logged in users
app.get('/user-settings', checkLoggedIn, (req, res) => {
      //Logic
});
In Passport.js, req.isAuthenticated() is a method that is part of the Passport middleware. It checks whether a user is authenticated or not. When a user logs in, Passport.js manages the authentication state and sets up the req.isAuthenticated() method.
Here's how it works:
Authentication Process: When a user successfully logs in, Passport.js handles the authentication process and sets up the user's authentication status.
req.isAuthenticated(): This method is then available in route handlers through thereq(request) object. When a request is made to a route, you can usereq.isAuthenticated()to check if the user is authenticated.
17.Implementing Logout Functionality
app.get('/auth/logout', (req, res) => {
    req.logout();
    return res.redirect('/login');
});
req.logout(): This is a method provided by Passport.js. It is used to terminate a user's login session. When a user logs out, req.logout() is called to clear the login session and removes the req.user property. This ensures that the user is no longer considered authenticated.
18. Final Version Of Code
Now here is what the code will look like after all of the grind.
const passport = require('passport');
const express = require('express');
const helmet = require('helmet');
const cookieSession = require('cookie-session');
const GoogleStrategy = require('passport-google-oauth20').Strategy;

function checkLoggedIn(req, res, next) {
    // req.user is available only when the user is logged in
    const isLoggedIn = req.isAuthenticated() && req.user;
    if (!isLoggedIn) {
        return res.status(401).json({
            error: 'User must log in',
        });
    }
    next();
}

// Save the session to the cookie
passport.serializeUser((user, done) => {
    console.log(user);
    done(null, user.id);
});

// Read the session from the cookie
passport.deserializeUser((userId, done) => {
    done(null, userId);
});

const OAuthRouter = express.Router();
OAuthRouter.use(helmet);
OAuthRouter.use(
    cookieSession({
        name: 'session',
        keys: ['secret-key'],

        // Cookie Options
        maxAge: 3 * 24 * 60 * 60 * 1000,
    })
);
OAuthRouter.use(passport.initialize());

const AUTH_TOKEN_PARAMS = {
    clientID: process.env.GOOGLE_CLIENT_ID,
    clientSecret: process.env.GOOGLE_CLIENT_SECRET,
    callbackURL: `https://localhost:3000/${process.env.REDIRECT_URI}`,
};

function verificationCallback(accessToken, refreshToken, profile, done) {
    console.log('Access token received, Profile: ', profile);
    return done(null, profile);
}

passport.use(new GoogleStrategy(AUTH_TOKEN_PARAMS, verificationCallback));

// Redirect the user to Google for authentication
OAuthRouter.get(
    '/auth/google',
    passport.authenticate('google', { scope: ['profile', 'email'] })
);

// The callback after Google has authenticated the user
OAuthRouter.get(
    '/auth/google/callback',
    passport.authenticate('google', {
        failureRedirect: '/login',
        successRedirect: '/',
    })
);

// Logout functionality
OAuthRouter.get('/auth/logout', (req, res) => {
    req.logout();
    return res.redirect('/login');
});

module.exports = OAuthRouter;


