Introduction
Welcome to the world of Node.js – where JavaScript transforms from a front-end scripting language to a full-stack powerhouse. If you're new to the realm of web development or a seasoned coder looking to expand your toolkit, you're in the right place.
In this blog, we'll embark on a guided exploration of Node.js. From installing it on your machine to creating your first server, we'll follow a beginner-friendly approach. By the end, you'll grasp the essence of Node.js and its role in shaping the modern web.
So, buckle up as we embark on this journey into Node.js together – no complicated jargon, just pure coding discovery. Let's get started!
Pre-requisites: JavaScript
What is Node.js?
Before we dive into Node.js, let's get the basics straight about how computers handle code. This will help us grasp the concept of Node.js more easily.
How Computers Interpret Code:
Computers understand only machine code, a complex series of ones and zeroes. Yet, writing, reading and understanding this code is challenging. So, assembly language was born, acting as a bridge between machine code and higher-level languages. Programming languages like C++ were built on this, abstracting complexity and making way for easier coding. The resulting C++ code is then compiled into machine code, enabling computers to execute it.
JavaScript's Unique Position:
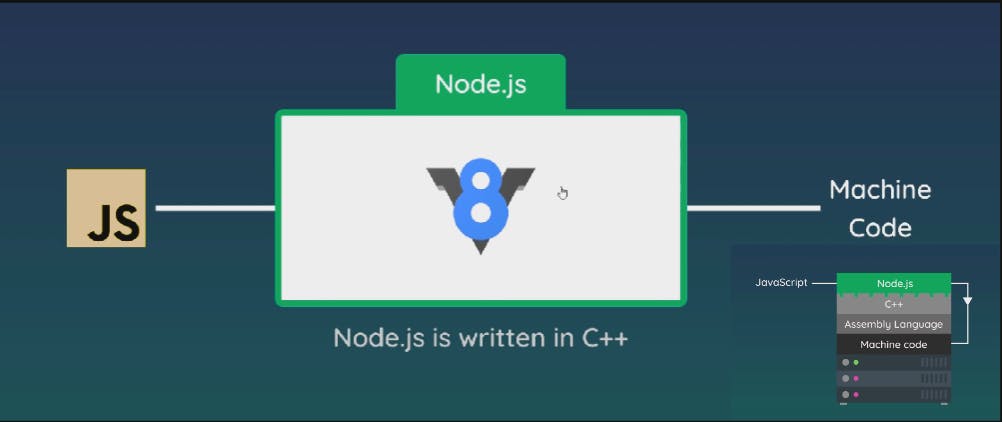
JavaScript, being a high-level language, further abstracts coding complexities. However, computers cannot directly understand it. This is where the V8 engine (JS engine) comes in. Situated within browsers, it compiles JavaScript into machine code at run-time, making it comprehensible to computers within the browser environment. However, we cannot run JavaScript outside the browser because we do not have the V8 engine present outside browsers.

Enter Node.js: Unleashing JavaScript Beyond the Browser:
Now this is when Node.JS comes into the picture. Node.JS is a program written in C++ enabling JavaScript to run directly on our computer. When you install Node.js, it comes with the V8 engine, which now works outside the browser context. This allows JavaScript to be compiled into machine code, letting us run it on servers, computers, and not just within browsers.
Role of Node.JS:
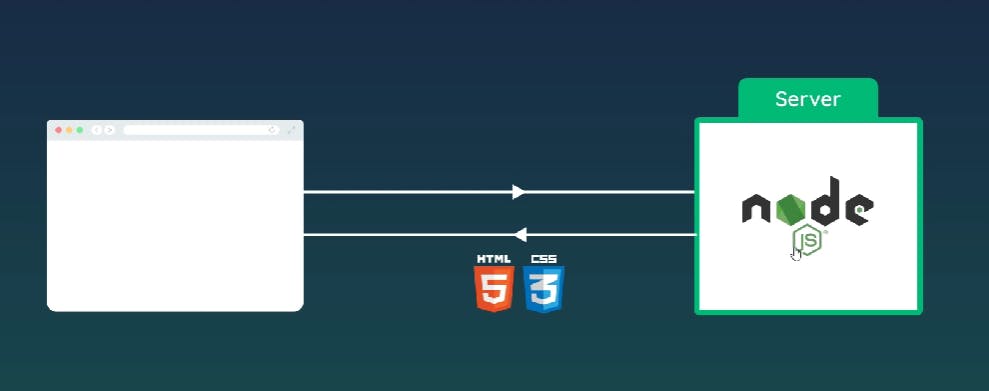
Now we have got an idea of what node is used for and now let us look at how it can be used in web applications. The role of node.js on a website is to run JavaScript on the server and handle requests coming from the client/browser.
Node.js Basics
The global object:
In Node.js, the global object serves as a toolbox that contains essential tools for your code to work effectively just like the window object in web browsers. Think of it as a central hub where you can access various functionalities. However, it's important to note that the global object in node.js is slightly different than the window object in the web browser.
To know what methods you can access under the global variable, just run the following code in the terminal.
 console.log(global);

 //Run the following command in terminal
 node file-name.js
modules & require keyword:
Consider modules to be the same as JavaScript libraries. They are nothing but a set of functions you want to include in your application.
Node.js also provides a set of built-in modules that you can use without any further installation.
Eg: File System module (fs)
Also, you can create your own modules and easily include them in your applications using the
requirekeyword.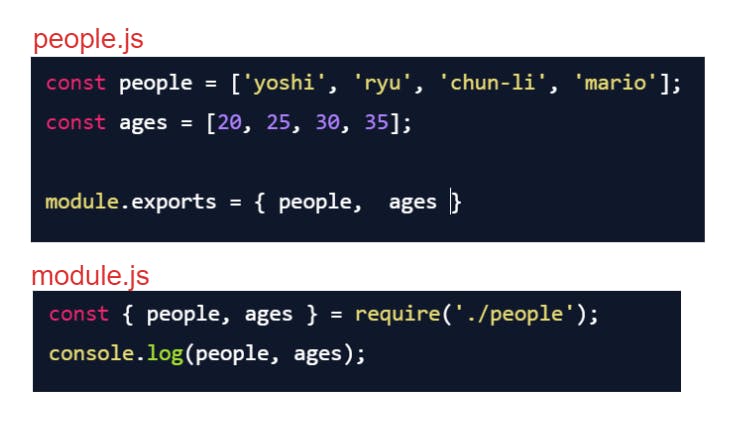
Let us first understand what
requireandmodule.exportskeyword is used for.require: herequirefunction is a fundamental part of Node.js that allows you to load modules (JavaScript files) into your program. It's how you can include code from other files to use in your current module. When you userequire, Node.js looks for the specified module file, executes its code, and then returns the exported values or functionalities.module.exports: Themodule.exportsobject is used to define what parts of a module should be accessible when the module is imported into another module usingrequire. You can attach properties or functions tomodule.exports, and these become the "public" interface of the module.
Now let's understand what's happening in the above program.
require('./people')is executed: Node.js looks for thepeople.jsfile in the current directory and executes its code. Insidepeople.js, thepeopleandagesarrays are defined and attached to themodule.exportsobject.The exported object is returned: When the code in
people.jsfinishes executing, themodule.exportsobject (containing thepeopleandagesarrays) is returned to therequire('./people')statement inmodule.js.Destructuring: The returned object is destructured in
module.js. This means that thepeopleandagesarrays are extracted from the returned object and assigned to the corresponding variables (peopleandages) in the current module (module.js).Accessing the data: Now
module.jshas access to thepeopleandagesarrays, and logs it to the console.
File handling
To perform operations on files, we'll import the "File System" module. This module, commonly known as the fs module, equips us with functions to handle tasks like reading and writing files, managing directories, and more. It serves as a valuable tool for managing file-related actions within our applications. It would look something like this: const fs=require('fs'); . All operations are asynchronous operations.
Reading a file:
syntax:
fs.readFile('path', callback);path: It is the relative path of the file to be read.callback: a callback function that will be fired after reading is complete or if there is some error
    fs.readFile('./docs/blog.txt', (err, data) => {
      if (err) {
        console.log(err);
      }
      console.log(data.toString());
    });
If the file we want to read is not found, it will throw an error.
Writing to a file:
syntax:
fs.writeFile('path', 'content', callback);path: It is the relative path of the file to be written.content: This is the content you want to write to the filecallback: a callback function that will be fired after writing is complete
    fs.writeFile('./docs/blog.txt', 'hello, world', () => {
      console.log('file was written');
    });
If the file we are referring to is not found, node.js will create that file at the given path and write to that path.
Handling directories (creating and removing directories):
Checking if a directory/file exists:
syntax:
fs.existsSync('path/dir-name');path/dir-name: relative path of the directory/filefs.existsSync('./assets')
Creating a new directory:
syntax:
fs.mkdir('path/dir-name', callback);path/dir-name: relative path of the directorycallback: fired when the directory is created or if there is some errorif (!fs.existsSync('./assets')) { fs.mkdir('./assets', err => { if (err) { console.log(err); } console.log('folder created'); }); }If the directory already exists, it throws an error. This is why, we create a directory only if it does not exist.
Deleting a directory:
syntax:
fs.rmdir('path/dir-name', callback);path/dir-name: relative path of the directorycallback: fired when the directory is deleted or if there is some errorif (fs.existsSync('./assets')){ fs.rmdir('./assets', err => { if (err) { console.log(err); } console.log('folder deleted'); }); }If the directory does not exist, it throws an error. This is why, we delete the directory only if it exists.
Deleting a file:
syntax:
fs.unlink('path', callback);path: relative path of the directorycallback: called when the file is deleted or if there is some error
        if (fs.existsSync('./docs/deleteme.txt')) {
          fs.unlink('./docs/deleteme.txt', err => {
            if (err) {
              console.log(err);
            }
            console.log('file deleted');
          });
        }
Streams & Buffer:
Now we have seen how we can read and write contents to a file. But sometimes, those files might be very large and therefore may take a lot of time to read content from it.
To solve this problem, we use something called streams. By using streams, we can start using data even before it is fully fetched/read.
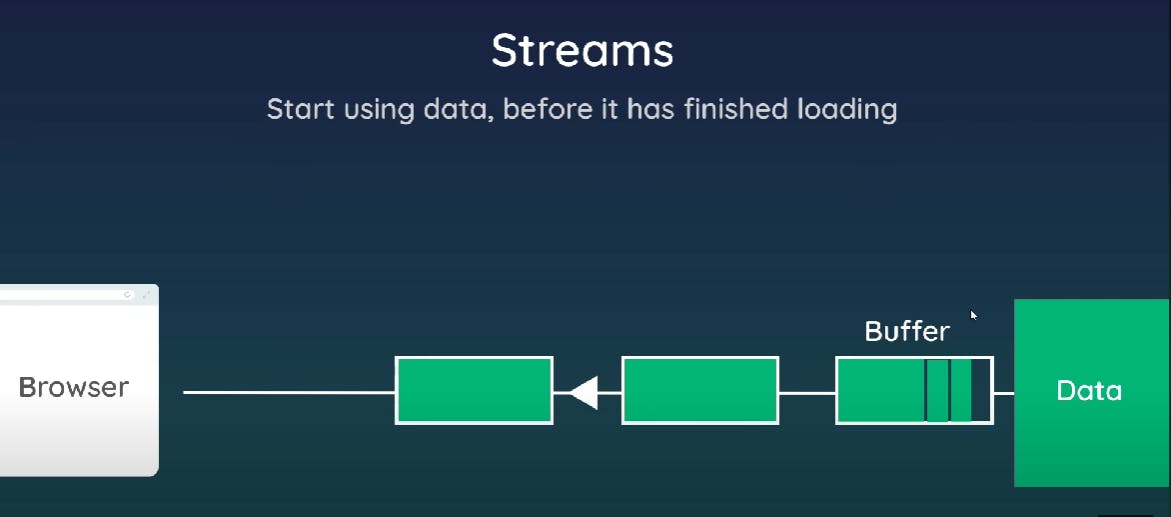
While using stream, small chunks of data are filled into something called as the buffer and sent down the stream every time the buffer fills. So now, every time we get a new chunk of data from the stream, we can start using it instead of waiting for the entire data to arrive.
Eg: We can see this in action when we are watching some videos on youtube or Netflix where a little bit of data is sent to the browser in intervals and we can start watching it right away without having to wait for the whole video to be downloaded.
We will discuss about readStream and writeStream in this section.
The first step is obviously to import the file stream module. Then we create the required stream. Let us look at the syntax of read and write stream.
Read stream:
readSream = fs.readStream('path of file', { encoding:'utf8'});Write stream:
writeStream = fs.writeStream('path to file');Here
'path to file'refers to the relative path of file to be written or read.const fs = require('fs'); const readStream = fs.createReadStream('./blog3.txt', { encoding: 'utf8'}); const writeStream = fs.createWriteStream('./blog4.txt'); //'on' is an event listener on readStream ans listens to 'data' // event ie it is fired evey time we get a new chunk of data, it fires // the callback function readStream.on('data', chunk => { console.log('---- NEW CHUNK ----'); console.log(chunk); writeStream.write('\nNEW CHUNK:\n'); writeStream.write(chunk); });The above code is reading the content of
blog3.txtand writing it toblog4.txt.We can achieve the same functionality ie read from one file and write it to another file by using something called piping.
readStream.pipe(writeStream);NOTE: piping can only be done from a readStream to a writeStream.
Clients & Servers
Earlier, we discussed that we will use node.js to build servers that will serve the requests sent by the browser ie clients. But there are a million servers present over the internet, how will the client know which server to access?
To address this, we should know something about IP addresses and domains. In simple words, a domain name is like the contact name in your phone book and the IP address is its corresponding phone number. Each computer has a unique IP address to identify on the internet.
To know more about IP addresses and domain names, check out this article on GFG.
Now knowing what IP address and domain name is, we will see how a client requests service from the server.
We now know that both client and server have their unique IP address.
The client sends a request to the server using the server's IP address.
The server serves the client by sending the required information using the client's IP address.
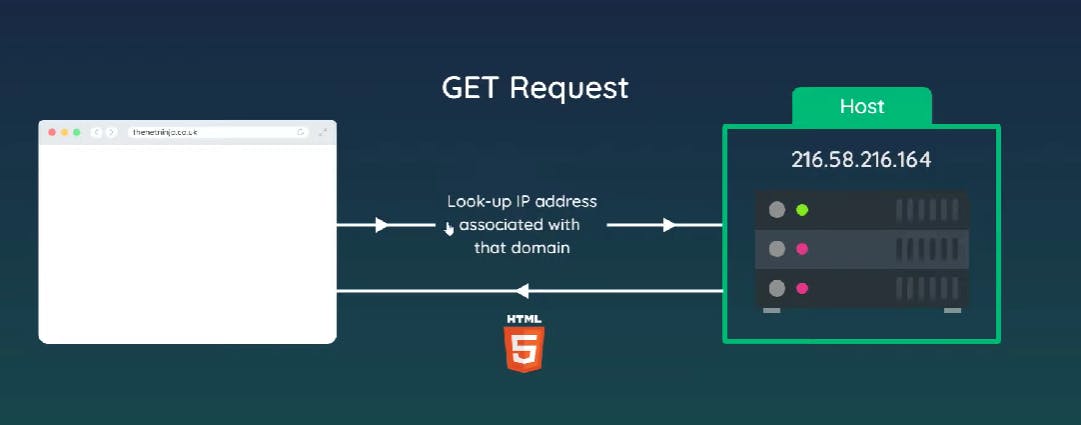
This communication between the server and client happens via a protocol called the Hyper Text Transfer Protocol (HTTP). It is just a set of instructions that tells how communication occurs. Just like humans use a language to communicate, computers use HTTP to communicate with each other.
Creating a server
Let us directly dive into the code.
const http = require('http');

const server = http.createServer((req, res) => {
  console.log('request made');
});

// localhost is the default value for 2nd argument
server.listen(3000, 'localhost', () => {
  console.log('listening for requests on port 3000');
});
http=require('http'): Importing the http module.http.createServer(): This is used to create an HTTP server and takes a callback function as an argument. The callback function gets two arguments ie the request object and the response object. The request object contains all the information about the request like the URL that is being requested, request type etc. The response object will be used to send our response to the client.
So till now, we have just created a server that is not doing anything. It is not listening for any request nor is it responding.
server.listen( portNo, 'hostname', callback): Now the server is listening for the requests on 'hostname' and the given port number.port number: We learned earlier what IP addresses are and we also know that each computer on the network has a unique IP address and we request and serve computers using them. What is the need for port numbers?Let us understand with an example. Say there are multiple tabs open on your browser and you request for gmail.com on one of them. The browser sends a request to the server's IP address and the server sends relevant information back to the client using the client's IP address. Now the client has got the response, how does it know to which tab should I display the webpage? It shouldn't happen that I request from one tab and the webpage is opening on another tab. This is where port numbers come into the picture. Each tab has a unique port number and the client sends a response to the exact tab that requested it using the port number.
hostname: A hostname is a human-readable label assigned to a device connected to a network, like a computer or a server. It's used to identify and locate that device in a way that's easier for people to remember than using just numerical IP addresses. For example, in the web address "example.com," "www" is the hostname. The default value of hostname is 'localhost'. Local hows is nothing back but your own computer. Here your computer is acting both as client and server.
Request & Response
We saw in the previous section that the request object contains all information about the request and the response object is used to send a response back to the client.
const server = http.createServer((req, res) => {
    console.log(req.url, req.method) ;
});
So as shown in the code above, we can access different attributes of the request object. You can get information of all the attributes of the object by logging it on Colsole and try accessing the required attribute console.log(req).
const server = http.createServer((req, res) => {
    res.setHeader(‘Content-Type', ‘text/plain');
    res.write('hello');
    res.end();
}
res.setHeader('Content-Type', 'text/plain');sets the type of content that the server will send back to the client. In this case, it's telling the client that the response will be in plain text format.res.write('hello');writes the text "hello" to the response. This is the actual content that will be sent to the client.res.end();signifies that the response is complete and ready to be sent back to the client.
To run the server, we have to run it using node server.js. Now we search for localhost:3000/ and it sends a request to the http server that we have created. The server sends the response back to the browser and the browser displays 'hello' on the browser.
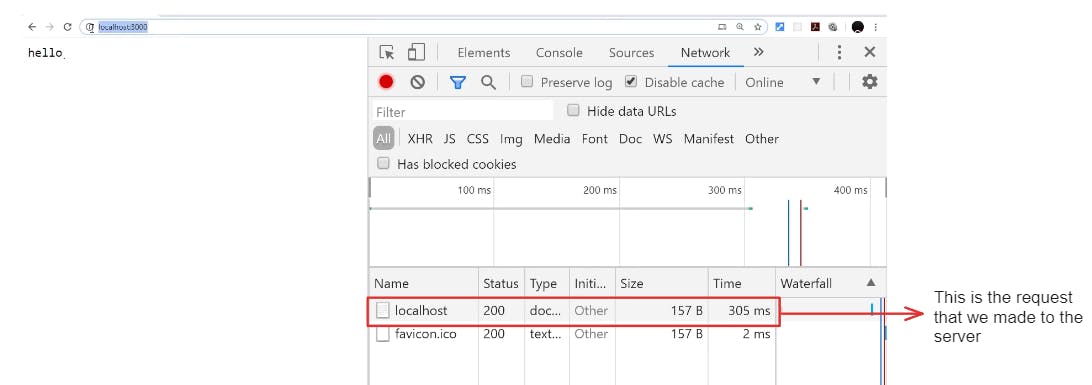
We can also send HTML as a response by just changing the header and the content we are writing.
res.setHeader('Content-Type', 'text/html')res.write('<p>hello</p>')
Now this method is fine when we are sending small amount of data. But this is not a good way to send a response when we are sending a lot of data back to the client. A better approach will be to write the html in some other file and import it to the server and then send it as a response.
const http = require('http');
const fs = require('fs');
const server = http.createServer((req, res) => {
    res.setHeader('Content-Type’, ‘text/html');
    fs.readFile('./views/index.html', (err, data) => { // send an html file
        if (err) {
            console.log(err);
            res.end())
        }else {
            res .write(data) ;
            res.end();
        }
    }
}
The above code is fine if we want to render only a single html page, but that is not how websites are built in real life. Each website has multiple pages and we need to render pages based on that. This is how we will handle it:
const http = require('http');
const fs = require('fs');
const server = http.createServer((req, res) => {
    res.setHeader('Content-Type’, ‘text/html');
    const path = './views/';
    switch (req.url){
        case '/':
            path += 'index.html';
            break;
        case '/about':
            path += 'about.html';
            break;
        default:
            path += '404.html';
            break;
    }
    fs.readFile(path , (err, data) => { // send an html file
        if (err) {
            console.log(err);
            res.end())
        }else {
            res .write(data) ;
            res.end();
        }
    }
}
Status Codes and Redirects
Whenever we request some resource from the backend server, it responds with a resource or with an error. But it sends us something called the status code which helps us know what actually happened to the request. It ranges from 100-599. But we need not know everything. Here are some status codes which is enough for us to get started.
200: This status code indicates that the client's request was successful, and the server has successfully processed it
301: When a server responds with a "301 Moved Permanently" status code, it informs the client that the requested resource has been permanently moved to a new location.
404: A "404 Not Found" status code indicates that the server couldn't find the requested resource.
500: The "500 Internal Server Error" status code indicates that something went wrong on the server's end while processing the request.
switch (req.url){
    case '/':
        path += 'index.html';
        res.statusCode = 200;
        break;
    case '/about':
        path += 'about.html';
        res.statusCode = 200;
        break;
    default:
        path += '404.html';
        res.statusCode = 404;
        break;
}
Now let us look at redirects. This is helpful when we had a page with a route earlier that no more exists. For example, the website had an 'about-me' page which no longer exists and is moved to the path 'about'.
case '/about-me':
    res.setHeader('Location', '/about'); //Redirects page to /about
    res.statusCode = 301;
    res.end();
    break;
So now we know how node works and how to handle requests for different routes and send back responses in the form of html pages.
Until now we have used pure node.js and built a server. But this gets complex as we start building bigger applications. Handling requests using switch cases is no more efficient and easy. Fortunately, we have a third-party package called express which can help us manage all of this more easily and efficiently.
In our upcoming blog, we'll delve into the world of Express.js and discover how it revolutionizes the way we build web servers.
